The Definitive Home Golf Simulator Setup Guide (2026): Costs, Space & Tech
Building a home golf simulator used to be a luxury reserved for country clubs and massive basement renovations. In 2026, the landscape has completely shifted. You can now build a highly accurate, fully immersive home golf simulator setup in your garage for under $5,000.
But while the financial barrier to entry has plummeted, the technical complexity has skyrocketed. A simulator is a delicate ecosystem. Your launch monitor, projector, impact screen, hitting mat, and PC software must communicate seamlessly. Buy the wrong launch monitor for your room’s depth, or pair a premium tracking system with a cheap mat that destroys your elbows, and you have wasted thousands of dollars.
At XS Golf, we have tested everything from $200 portable devices to $20,000 commercial overhead arrays. This is our definitive framework for building a home golf simulator setup in 2026, backed by research synthesized from manufacturer specs, independent testing, and real-world owner reports.
Phase 1: The Spatial Blueprint (The 10-10-16 Rule)
The number one reason home simulators fail is spatial constraints. First-time buyers often assume an 8.5 or 9-foot ceiling is “good enough.” It is not. While you might physically clear the ceiling with a mid-iron, a low ceiling triggers “indoor swing syndrome”—a psychological restriction where you subconsciously alter your mechanics to avoid hitting the drywall.
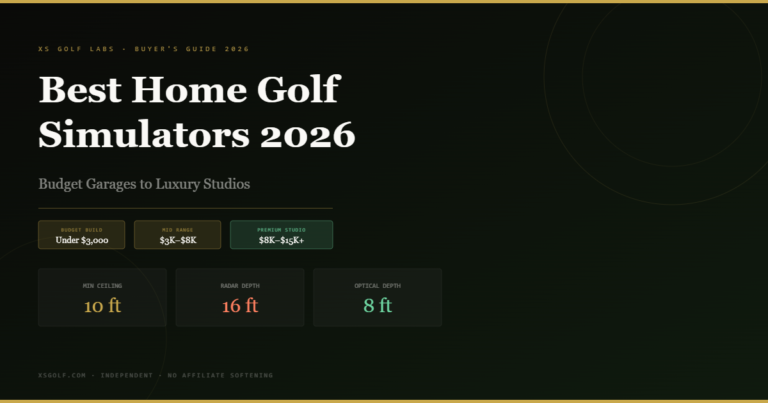
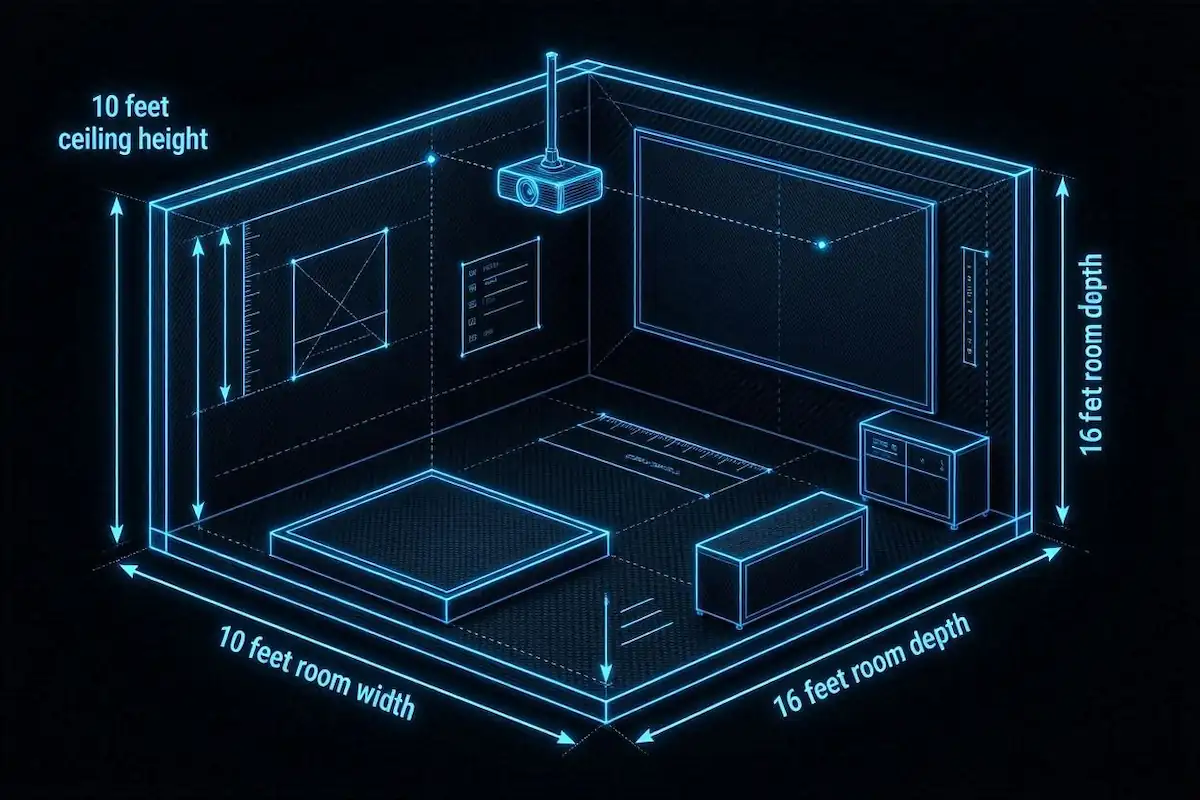
If you are planning a build, you must adhere to the XS Golf 10-10-16 Rule for a standard radar-based setup:
- 10-Foot Ceiling: The absolute minimum requirement for uninhibited, aggressive driver swings for players of all heights. Watch out for garage door tracks, lighting fixtures, or overhead beams that drop into this space.
- 10-Foot Width: The minimum width required to comfortably center the golf ball and swing without hitting the side walls of your enclosure. Ideally, aim for 15 feet if you want to accommodate both right- and left-handed players without shifting the hitting mat.
- 16-Foot Depth: If you are using a Doppler radar launch monitor, you need roughly 8 feet from the ball to the screen, and another 8 feet behind the ball for the radar to track the flight and accommodate your backswing.
Note: If your room lacks 16 feet of depth, you are not disqualified from building a simulator — but you are strictly disqualified from using Radar technology. You must pivot to Optical/Camera systems (detailed below).
Phase 2: The Launch Monitor Decision Framework
Your room dimensions dictate your technology. In 2026, launch monitors fall into three specific categories, each with distinct spatial requirements and data accuracy tolerances.
1. Photometric (Camera-Based) Launch Monitors
- How it works: High-speed cameras capture the ball at impact to measure speed, launch angle, and spin.
- Space required: Minimal depth. The unit sits directly parallel to the golf ball.
- Best for: Tight garages, spare bedrooms, and budget-to-mid-tier builds.
2026 Benchmarks:
- Square Golf ($699): The undisputed king of the budget optical category. Delivers lightning-fast shot display with zero mandatory subscription fees.
- SkyTrak ST MAX ($2,995): The best option for Mac users (no Windows PC required) with an incredible first-party app. Also available as SkyTrak+ at ~$1,795 closeout pricing.
- Bushnell Launch Pro Circle B ($2,499): Built on the Foresight GC3 engine — the most accurate floor-standing unit we have tested. Provides Tour-level data for a fraction of the cost of a GCQuad. A screenless, indoor-only LPi edition is available for $1,499.
- Uneekor Eye Mini Lite ($2,750): An indoor-only, PC-dependent powerhouse that rivals the Launch Pro in pure analytics.
2. Doppler Radar Launch Monitors
- How it works: Uses microwave signals to track the ball’s actual flight path through the air.
- Space required: Massive depth. The unit must sit 7–8 feet behind the ball, and the ball needs 8–10+ feet of flight before hitting the screen.
- Best for: Deep garages, outdoor net setups, or driving range crossovers.
2026 Benchmarks:
- FlightScope Mevo Gen 2 ($1,299): Offers the most robust data suite available without a subscription.
- Rapsodo MLM2PRO ($699): A hybrid radar/camera unit that is highly portable but requires specialized Titleist RPT dotted balls to capture accurate spin data indoors.
3. Overhead Commercial Systems
- How it works: Quadrascopic or infrared camera arrays mounted directly to the ceiling.
- Space required: Requires strict ceiling mounting (typically 9.5–10.5 feet high). Leaves the floor completely clear.
- Best for: Luxury home studios, commercial bays, and seamless left/right-handed player integration.
2026 Benchmarks:
- Trackman iO ($14,000+): Fuses radar and infrared imaging into a ceiling unit that requires zero minimum distance in front of or behind the ball.
- Foresight Falcon ($15,999): Uses GCQuad-level photometric tech packed into a low-profile overhead mount with zero annual subscription fees.
- Uneekor EYE XO2 ($11,000+): Features a massive 28×21-inch hitting zone that easily accommodates mixed-dexterity groups without moving the ball.
The Outlier: Garmin Approach R50
The Garmin Approach R50 ($4,999) sits in a category of its own. It is a premium tracking unit with a built-in 10-inch touchscreen that acts as the simulator console itself — no gaming PC required. Simply plug an HDMI cable from the R50 directly into your projector to play 43,000 pre-loaded courses.
Phase 3: The XS Golf Cost Breakdown Matrix
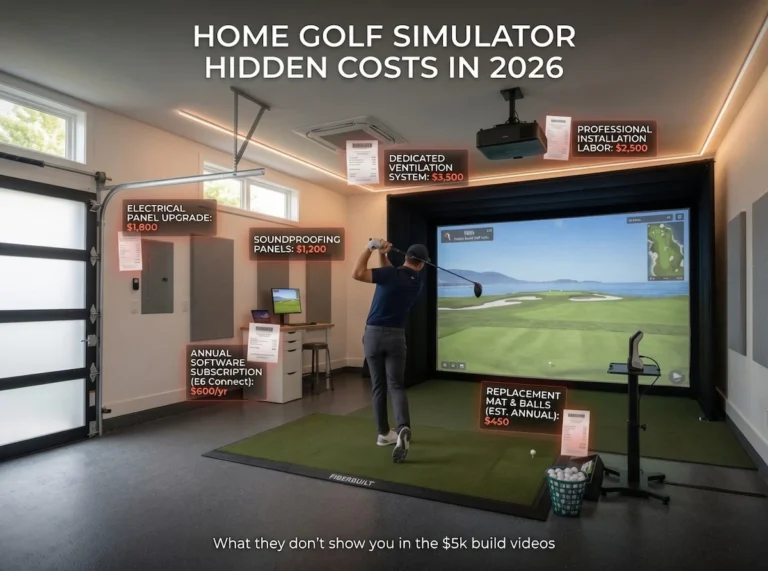
First-time buyers constantly make the mistake of spending their entire budget on a launch monitor, leaving nothing for the impact screen, mat, or gaming PC. A functional simulator is a “cost stack.” Here is exactly what you get at the four primary budget tiers in 2026. To avoid budget surprises in year two, review the true 3-year TCO of home golf simulators, covering software subscriptions, mat wear, and maintenance.
Tier 1: The $2,000 Ultra-Budget Setup (Practice & Net)
If you don’t have the space for a projector and a full enclosure, you can still get highly accurate data and simulation on a tablet.
- Launch Monitor: Garmin Approach R10 Practice Bundle (~$1,000) or Voice Caddie SC4 Pro ($499).
- Impact Zone: The Net Return Pro or a standard pop-up net paired with a budget 5×4 stance mat.
- Software: Run Garmin Home Tee Hero on your iPad or phone.
- The Verdict: Perfect for offseason swing maintenance in a small garage. It sacrifices visual immersion but delivers vital club and ball data.
Tier 2: The $5,000 Garage Sweet Spot
This is where true immersive simulation begins. By utilizing DIY hacks for your flooring and enclosure, you can dedicate your budget to a highly accurate launch monitor and 4K projection. For a full parts list and step-by-step plan at this price point, see our $5,000 garage simulator build guide.
- Launch Monitor: Square Golf ($699) or Bushnell Circle B LPi ($1,499).
- Impact Zone: DIY enclosure using acoustic wall panels, a triple-layer 3D mesh impact screen, and a “shank wall” made of foam tiles.
- Flooring: EVA foam puzzle gym mats covered in cheap outdoor turf, paired with a custom-cut premium hitting strip inserted into a stance mat.
- Computing & Visuals: Refurbished Gaming PC with an RTX 4070 GPU (~$1,000) and a 1080p Short-Throw Projector (~$600).
- Software: GSPro ($250/year).
- The Verdict: The ultimate high-ROI build. You get 95% of the accuracy of a commercial setup by cutting out the “golf tax” on the surrounding materials.
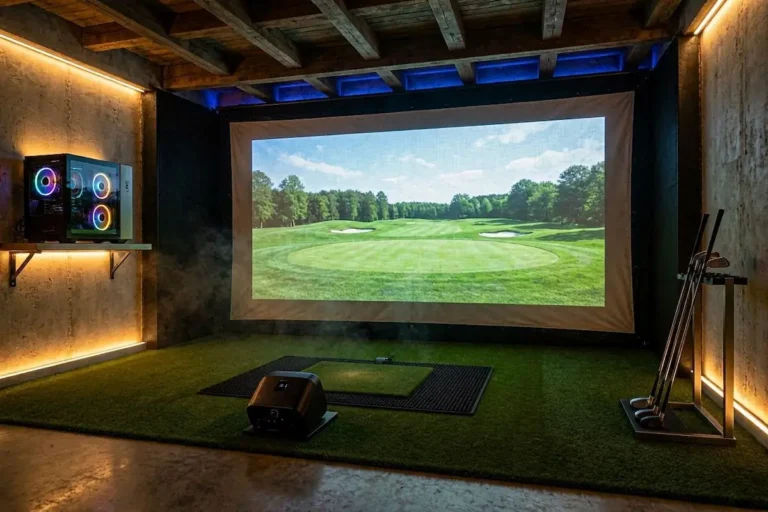
Tier 3: The $10,000 Enthusiast Studio
This tier upgrades you from DIY aesthetics to a polished, professional-looking room using premium prefabricated enclosures and Tour-level tracking.
- Launch Monitor: Uneekor Eye Mini ($4,500), Bushnell Launch Pro ($2,499), or SkyTrak ST MAX ($2,995).
- Impact Zone: The Indoor Golf Shop SIG10 or SIG8 enclosure with a premium, tension-mounted screen.
- Flooring: Fiberbuilt Grass Series or Carl’s Place premium hitting mats.
- Computing & Visuals: High-end Gaming Desktop and a 4K Laser Short-Throw Projector (BenQ TK700STi or equivalent).
- The Verdict: A gorgeous, reliable, hyper-accurate home studio that rivals the bays at your local commercial facility.
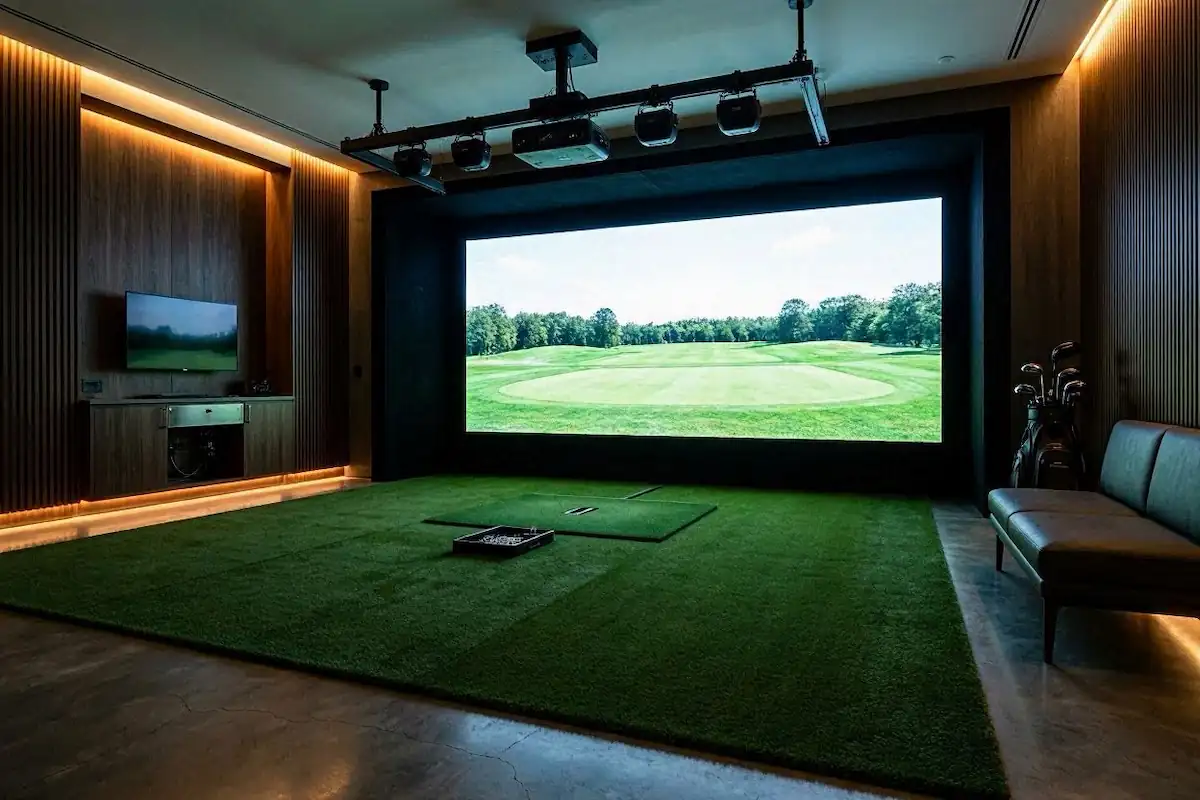
Tier 4: The $20,000+ Luxury Studio
Money is no object. You want an overhead system with no floor wires, seamless left/right-hand play, and zero subscription fees.
- Launch Monitor: Foresight Falcon ($15,999) or Trackman iO ($14,000+).
- Impact Zone: Massive SIG12 Enclosure (requires 12+ feet of width) or custom-built upholstered wall panels.
- Flooring: Custom wall-to-wall putting turf with integrated, flush-mounted hitting strips.
- The Verdict: Uncompromising Tour-level precision and architectural beauty.
Phase 4: The Impact Zone (Mats, Screens, and Acoustics)
The launch monitor is the brain, but the impact zone dictates how much you will actually enjoy using the room. Once your gear is chosen, our step-by-step simulator installation guide walks through mounting the screen, enclosure, and projector.
The Hitting Mat Injury Trap
Do not spend $3,000 on a launch monitor and $100 on a cheap, thin stance mat. Hitting down and through a golf ball onto concrete-backed artificial turf will quickly result in severe elbow and wrist tendinitis.
- The Premium Route: Buy a proven, injury-preventing mat like the Fiberbuilt Grass series or a Mattzilla ultra-thick nylon mat that punishes fat shots without punishing your joints.
- The DIY Hack: Buy a cheap 5×4 stance mat, cut a 1×2 foot rectangle out of the center, and insert a premium, high-quality hitting strip (thick nylon insert). You get a premium strike zone for a fraction of the cost.
Impact Screens and Acoustics
Budget impact screens bought off Amazon are dangerously loud (sounding like a gunshot at impact), have severe bounce-back risks, and lack image clarity. Invest in a triple-layer, sound-reducing 3D mesh impact screen. These screens absorb ball impacts like a pillow, keeping the noise down and preventing the image from bleeding through the fabric.

Phase 5: Computing, Projection, and Software
To get the most out of your simulator, you will want to run GSPro — the undisputed gold standard of 2026 simulation software, featuring over 1,500 community-built, hyper-realistic courses. We weigh GSPro against E6 Connect, Foresight FSX, and the other major platforms in our 2026 golf simulator software guide.
The PC Reality Check
Running GSPro in 4K requires massive computing power. Do not buy a gaming laptop. Laptops overheat under the sustained load of 4K 3D rendering and have significantly shorter lifespans. You must purchase a dedicated gaming desktop with a high-end dedicated graphics card — an NVIDIA RTX 4070 or better is highly recommended for 4K output.
Projector Selection (Throw Ratio)
You cannot use a standard office projector. You must buy a Short-Throw Projector. Short-throw lenses allow the projector to sit closer to the screen — usually directly above the golfer. If you use a long-throw projector behind you, your body will cast a massive shadow over the screen during your swing. For the best visual fidelity, a 4K Laser short-throw projector (like the BenQ TK700STi) delivers billion-color depth and massive lumen output that cuts through ambient garage lighting.
The Final Verdict
Building a home golf simulator in 2026 is an exercise in resource allocation. Prioritize your room dimensions first. If you are squeezed for space, abandon radar and buy a camera-based unit like the Square Golf or Bushnell Launch Pro. Protect your joints with a high-quality hitting strip, deaden the sound with a 3D mesh screen, and power the entire system with a dedicated desktop PC.
Do that, and you’ll have a Tour-caliber training facility sitting 20 feet from your living room.